|
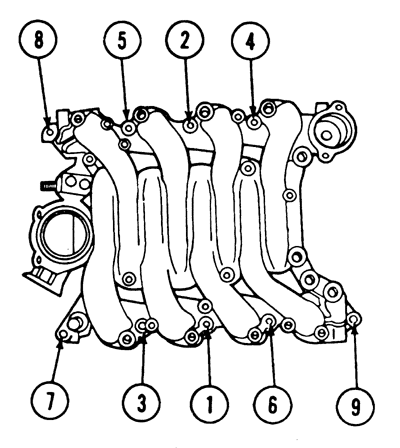
Intake manifold bolt torque sequence-4.6L engine
1995-2000 Ford Lincoln Mercury
4.6L Engine
Disconnect the negative battery cable.
Drain the cooling system. Relieve the fuel system pressure and disconnect the
fuel lines.
Wear eye protection
CAUTION:
Never open, service, or drain the radiator or cooling system when hot; serious
burns can occur from the steam and hot coolant. In addition, when draining
engine coolant, keep in mind that cats and dogs are attracted to ethylene glycol
antifreeze and could drink any that is left in an uncovered container or in
puddles on the ground. This will prove fatal in sufficient quantities. Always
drain coolant into a sealable container. Coolant should be reused unless it is
contaminated or is several years old.
Remove the wiper module and the air inlet tube. Release the belt tensioner and
remove the accessory drive belt.
Tag and disconnect the spark plug wires from the spark plugs. Disconnect the
spark plug wire brackets from the valve cover studs.
Disconnect both of the ignition coils and the CID sensor. Tag and disconnect all
spark plug wires from both ignition coils. Remove the 2 bolts retaining the
spark plug wire tray to the coil brackets and remove the spark plug wire
assembly.
Disconnect the alternator wiring harness from the junction block at the fender
apron and alternator. Remove the bolts retaining the alternator brace to the
intake manifold and the alternator to the engine block and remove the
alternator.
Raise and safely support the vehicle. Disconnect the oil sending unit and EVO
harness sensor and position the wiring harness out of the way.
Disconnect the EGR tube from the right exhaust manifold and lower the vehicle.
Remove the 42-pin engine harness connector from the retaining bracket on the
vacuum brake booster and disconnect the connector.
Disconnect the air conditioning compressor, crankshaft position sensor and
canister purge solenoid.
Remove the PCV valve from the valve cover and disconnect the canister purge vent
hose from the PCV valve.
Disconnect the accelerator and cruise control cables from the throttle body
using a small prybar. Remove the accelerator cable bracket from the intake
manifold and position out of the way.
Disconnect the throttle valve cable from the throttle body and the vacuum hose
from the throttle-body adapter port.
Disconnect both oxygen sensors and the heater supply hose.
Remove the 2 bolts retaining the thermostat housing to the intake manifold and
position the upper hose and thermostat housing out of the way
NOTE
The 2 thermostat housing bolts also retain the intake manifold.
Remove the bolts retaining the intake manifold to the cylinder heads and remove
the intake manifold. Remove and discard the gaskets.
To install:
Clean all gasket-mating surfaces. Position new intake manifold gaskets on the
cylinder heads. Make sure the alignment tabs on the gaskets are aligned with the
holes in the cylinder heads.
Install the intake manifold and the retaining bolts. Tighten the bolts, in
sequence, to 15-22 ft. lbs. (20-30 Nm).
Inspect and replace the O-ring seal on the thermostat housing. Position the
housing and upper hose and install the 2 bolts. Tighten to 15-22 ft. lbs. (20-30
Nm).
Connect the heater supply hose and connect both oxygen sensors.
Connect the vacuum hose to the throttle-body adapter port. Connect and, if
necessary, adjust the throttle valve cable.
Install the accelerator cable bracket on the intake manifold and connect the
accelerator and cruise control cables to the throttle body.
Install the PCV valve in the valve cover and connect the canister purge solenoid
vent hose. Connect the air conditioning compressor, crankshaft position sensor
and canister purge solenoid.
Connect the 42-pin engine harness connector. Install the connector on the
retaining bracket on the vacuum brake booster.
Raise and safely support the vehicle. Connect the EGR tube to the right exhaust
manifold and tighten the line nut to 26-33 ft. lbs. (35-45 Nm).
Connect the EVO sensor and oil-sending unit. Lower the vehicle.
Position the alternator and install the retaining bolts. Tighten to 15-22 ft.
lbs. (20-30 Nm). Install the 2 bolts retaining the alternator brace to the
intake manifold and tighten to 6-9 ft. lbs. (8-12 Nm).
Connect the alternator wiring harness to the alternator, right-hand fender apron
and junction block.
Position the spark plug wire assembly on the engine and install the 2 bolts
retaining the spark plug wire tray to the coil brackets. Tighten the bolts to
6.0-8.8 ft. lbs. (8-12 Nm).
Connect the spark plug wires to the ignition coils in their proper positions.
Connect the spark plug wires to the spark plugs.
Connect the spark plug wire brackets on the valve cover studs. Connect both
ignition coils and CID sensor.
Install the accessory drive belt and the air inlet tube. Install the wiper
module and connect the fuel lines.
Refill coolant system, check for leaks.

| 